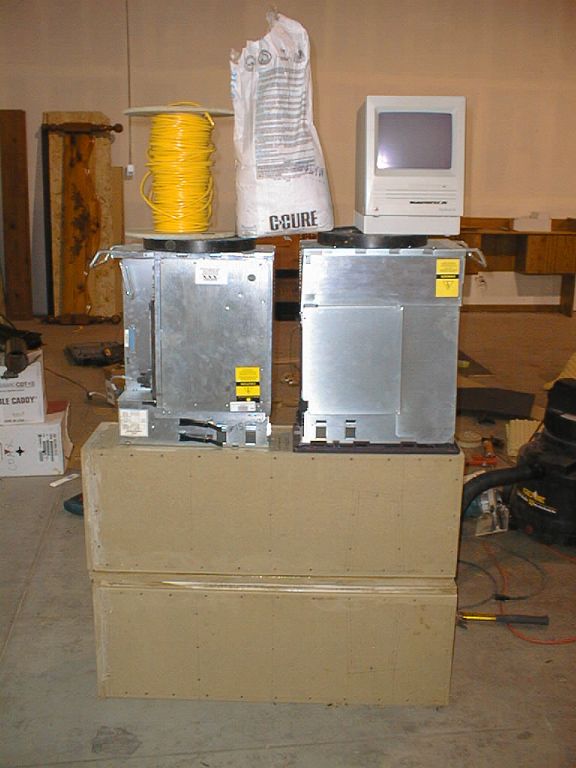
| Sometime
in the year 2000 - Introduction to the Swans M3 Speaker
2024 Update: I rebuilt these speakers 24 years later with new HiVi woofers, tweeters and a modified crossover. Check them out over at www.danmarx.org/blog.
A few months ago, I decided it was time to build a pair of full range
tower speakers to compliment my home theater system. So I got on
the Internet and began searching for kits and raw drivers that might make a
good pair of tower speakers and be within an allotted budget. Now
budget is
everything. Now the intent wasn't
to build a pair of speakers on a cheap budget. But I had considered a price
range of around $600-800 for the pair. So this is what I have
tried to stick with.
My initial designs consisted of all Scan-Speak drivers. I was downloading
and studying every aspect of their top few drivers. I looked up other
projects that used the speakers I wanted to use and then read everything
I could about their design and performance. There was always one
thing that bothered me most about these expensive highly acclaimed
drivers - the crossover was not a simple one. No one put a simple
2-way network on their 18W8545 driver. The response of that driver is
nothing even close to flat, and it takes some pretty powerful
software/hardware to model it accurately and produce a useable crossover
for it. So pricey drivers + cheap-o crossover = bad experience. I couldn't
convince myself to spend that kind of money on raw drivers, when I knew
I'd be shooting in the dark with the crossover.
Okay back to the Swans M3. How did I decide to build this
speaker? Swans doesn't even sell this speaker system anymore. Their web
site has no information on it whatsoever. If you do a search on
the web for it, the only thing that pops up are a bunch of discussion
forums in Chinese. As far as I'm concerned, no one this side of
Asia has actually built a Swans M3 speaker. So leave it to good ol'
Parts Express to do a factory buyout on tons of Hi-Vi Research drivers including
all the drivers to make the M3. Not only that, but they were also
offering the original crossovers. That's right, the original
crossover as designed, and manufactured by Hi-Vi Research. I could buy all the drivers for half what they
retailed at and not have to do an ounce of crossover design. It
also helped that the crossovers were selling for $9.95. Less than
1/4 their retail worth. Not only could I get away with building a great pair of
tower speakers, they were easily going to fall within my budget, and I
wouldn't have to design or even build the crossovers.
So quickly I ordered up all the necessary parts to get myself rolling
on building this brand new Swans M3 tower speaker system. I ended
up getting the crossovers from a guy named Jon who I met on the PE
discussion board. He came to my aid when PE sold out of the
crossovers before I had a chance to purchase them. He in the end
didn't need them and actually gave them to me, and in exchange asked me
to cut for him a few 4-3/4" round pieces of wood to fill the
tweeter hole for the RT1C which had sold out before he had a chance to
purchase them. Just wanted to say thanks Jon! You made this
whole project possible.
Now
finding
information on this kit is impossible. Even writing to Swans and calling
them on the phone numerous times did me no good. They never returned my
calls and never responded to my e-mails. So all the information and pictures I
did mange to find I have included here in this web page. So if you want to
learn more about this kit, look no further. What I found were
pictures, cabinet drawings and crossover schematics. Now cabinet design is
an area I know a little bit more about, so if I wanted to get to say that I
truly designed and build this speaker, I would at least have to do some
of it myself, being that the crossover and driver choices were made for
me. So I designed the enclosure to my own tastes and
likes. It does model the original design by Swans. Just
about the same height, same width, yet I opted to go with 1-1/8" PB
combined with 3/4", 1/4" and 1/8" MDF with substantial
bracing. So
my enclosure is actually a little bit deeper, taller, wider and heavier than what they called
for. But I did shoot for the same internal volume and tuning
frequency.
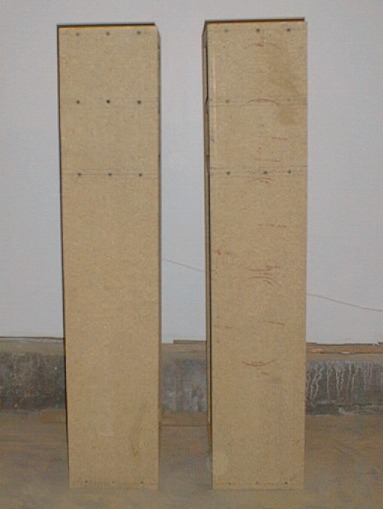
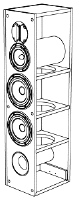
To the right I have posted pictures of these speakers as they have
progressed from raw pieces wood to final shape and form. In this
web page I'll talk a little bit about what I'm doing and why I'm putting it
together a certain way or whatever. Just to introduce the pictures
to the right, the first picture way at the top is one version of the
Swans M3. This one used the F6 instead of the W6 and placed the woofer on top of the tweeter. They later changed the
design to reflect the one I'm building now. Which I think looks
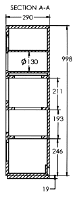
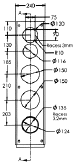
better anyway. Then we have the drawings by Swans outlining how
to build the enclosure. Pretty fancy and well done, but I didn't use
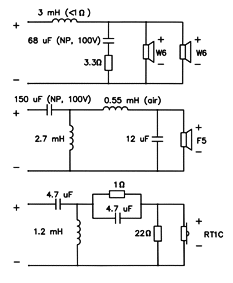
them. The crossover schematic is the most important picture
here. It clearly shows all the necessary values for each element
of its design. Not only that but it shows the proper positive and
negative wiring to each driver. You'll notice that for each
driver, polarity and phase is maintained. This is important to
note because on the actual crossovers themselves, there are little plus
and minus signs marked for each driver. They state, however, that polarity
is reserved for the midrange and the tweeter. I thought this was
rather odd, till I read an article in VOL III of Speaker Builder's 1999
issue where they did a review on the Swans M1 (which is basically
the Swans M3 minus the bottom two drivers). Besides that speaker getting
an absolute stellar review, Dennis Colin mentioned that he had noticed
that on the crossover board, it was also mislabeled as compared to the
schematics. He ended up wiring the speakers to reflect the
schematic and found that to be the proper wiring scheme. So I will
do the same. Since the tweeter topology is identical for
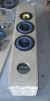
the two kits. The next three pictures are of the three drivers
that make up this kit. The original RT1C that I had
purchased had a plastic faceplate. I only bought it because it was
half the cost of the aluminum one. Now that Parts Express has
dropped the price of the aluminum RT1C, I decided to do the ol'
switch-a-roo and exchange the plastic ones for the aluminum
ones. My
tweeters were 4 months old, but I never used them! Wouldn't you
know that Parts Express exchanged them without question. About one
week later I had a brand new pair of all aluminum RT1-C tweeters.
Hats off to PE for their excellent customer care! The F5, a
great midrange, smooth response, phase plug, Kevlar cone and a cast
basket with matching gasket to go along with the W6. Then we have
the W6. In my opinion this is a fabulous woofer. It's looks
are beautiful, its response curve is very smooth (below 2KHz) and has a number a very
unique design characteristics to it that make it a one-of-a-kind driver.
Also to note, in the frequency range where it will be operating, the
cone break-up you see above 2KHz will be eliminated since its
crossover frequency is around 300Hz.
At the bottom of this page you will find drivers manufacturer's measured
data for each driver. All of these drivers exhibit great characteristics, from
response curves to physical design. I've never been a big fan of
Hi-Vi Research. I get the feeling that they're just not as popular
as some of the more elite line of manufacturers. Yet I believe
they can definitely hold their own. Well what I've heard of them anyway,
since I haven't finished either of my speaker projects which use these
drivers. I'll be sure and give a thorough review of them when they
are complete.
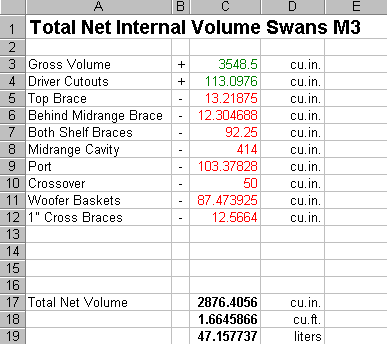
So now let's talk about the enclosure. To the right I have a
screen shot of a spreadsheet that I used to calculate the total net
internal volume. I have found that it is very important to know
exactly how much volume you have. In a design such as this, there
are many pieces and parts that will go inside the cabinet which will
reduce my volume. I always start with the gross volume of the
cabinet which is simply internal WxHxD. Then I add the volume of
the driver cutouts. Most people neglect to add this simple
volume of air, but as you can see with a 2" thick baffle and a
6" diameter hole and two drivers, I managed to squeeze an extra 113
cubic inches out of my box. Then I go through and measure and
calculate every piece of wood, brace, or structure that takes up volume
and start subtracting. The main things that need to be accounted
for are:
- Bracing and other internal reinforcing structures.
- The port (OD x Length that extends into the cabinet).
- The woofers (including magnet, frame and cone).
- Crossover components.
So with all that said the net internal volume
will sit at roughly 1.67 cubic feet (47.7 Liters). The tuning
frequency I have chosen will be 42 Hz. The port will be 4" round by about
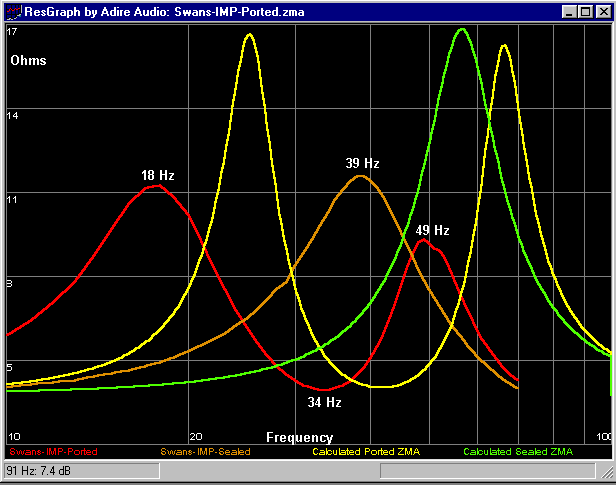
8.33" deep. As you can see by the simulation, this is a
compromised design with a small hump just above the tuning frequency. It's funny because if you look at the chart
for the W6, they state that it is suppose to be used in a cabinet that's
22 L and tuned to 42 Hz. Or in the case of two drivers, 44 L and
42 Hz. That doesn't even come close to the massive amount of
volume it actually takes to make the response flat. So I
guess they knew that but didn't seem to be concerned by it. You'll
notice the my Swans M3 cabinet is just a bit bigger than what they
recommend for this driver. Which is one of the reasons I chose to
stick with a tuning of 42 Hz. For some strange reason, it's what
Hi-Vi expected to this driver to do in an enclosure this size.
I wired the crossovers and drivers with 14 gauge MIT brand audiophile
speaker cable. I've got a couple of friends who are very into the
"pseudo science" of audio. Anything with a big brand
name on it and a high price tag "has to sound
better." Otherwise it wouldn't cost so much more,
right? Well, I'll let you be the judge of that one. This
speaker wire costs about $4 per foot. Very reasonably priced, especially
since I only used about 15 feet of it. The crystalline structure
of the copper used in this cable is suppose to be far superior than
standard copper. I counted 45 strands of what appeared
to be a 30 gauge wire. The jacket is very flexible and after
having crimped on all my female disconnects to the ends, I was very
pleased with the overall feel and look of the wire. It
soldered evenly to my crossover's circuit boards and should make for an
overall flawless integration of sound connecting the gold plated binding
post to the terminals on each driver. Whether they sound better
than any other copper wire remains to be seen (or heard).
If anything, the weakest
link in this audio chain will be the crossover components. Since
they were prefabricated by Hi-Vi Research, I really have no idea their
true make, type or real quality. I know there are 16 and 18 gauge
air core and iron core inductors (blah). Mixed with Dulcet Polypropylene
capacitors and a couple of generic electrolytics. I bypassed
the electrolytes with Dayton film and foil caps but after doing some
research, it turns out that 0.01uf bypass caps probably won't make that
much a difference. David B Weems says this about standard
electrolytes and using bypass caps, "If you are a purist on sound
matters, bypass the NP's in woofer circuits with 33 percent of the
capacitance Mylar." In the case of my midrange, I've got a
cheap 150uF NP in series with my driver. The
problem is to make a 150uf out of Mylar or Polypropylene caps, we're
talking over a hundred dollars and massive in size. It's not
feasible in most cases, and probably not all that necessary. To
follow Weem's rule, I should replace the current 150uF NP with a 100uF
and add a 50uF poly cap in parallel. In the case of the
woofers, the 68uF NP should be replaced with a 47 uF NP and a 22 uF poly
cap in parallel. Now I haven't done this yet, but I may do it
later. And if I do that later, I may replace some of the smaller
gauge iron core inductors as well. But before I try and redesign
the entire crossover, I'm going to give these a good hard, long listen
before I make any drastic changes. Who knows, I could make everything
sounds worse, and I really do need some times to gain a good
reference of how these speakers sound.
The
internal midrange enclosure is where I altered Swans design the
most. They called for a 5" tube to extend from the front to
the back of the enclosure. I just didn't like the idea that the
entire crucial range of frequencies (300-3KHz) was all going to be
reproduced from a driver in a tube. Have you ever placed a speaker
in a tube and listened to it? It sounds terrible. I don't
know if it's the cardboard or the round part of it, but it gives vocals
a very hollow sort of tunnel-like sound to them. Maybe I needed more
insulation on the tube I tested, but I didn't care for the sound it
produced either way. Maybe its psychological. So that's why
I chose to build a standard midrange cavity out of MDF and then add a
few twists to the design. First thing you'll notice is the
non-parallel top and bottom walls. This is to help minimize internal reflections. Also the rear wall is angled so as to redirect or deflect sound
from radiating straight back out into the cone. Once again,
minimizing internal reflections. The only parallel wall this enclosure will have is
on the sides. If I had made the sides also nonparallel, I would
have begun to sacrifice internal volume of either the woofer enclosure
or the midrange enclosure. I'm already right on the edge of where
I need to be for volume. I did make the midrange enclosure 1 Liter
larger than Swans had planned for with the tube. The tube would
have provided about 3.5 Liters, and my enclosure will provide 4.5
Liters. This results in a system Qtc of about 0.74 which should
work out just fine for my crossover point of 300 Hz. If the
crossover point were any lower, or the filter rate were any shallower, I
may have opted to do larger enclosure, or port the enclosure out the
rear of the cabinet. Nevertheless I expect to do a great deal of
experimenting with absorption materials until I get the midrange to
sound as balanced, natural, and uncolored as possible. I'm
thinking of something along the lines of a felt material, mixed with egg
foam, wool and polyfill. We'll see what I can come up with.
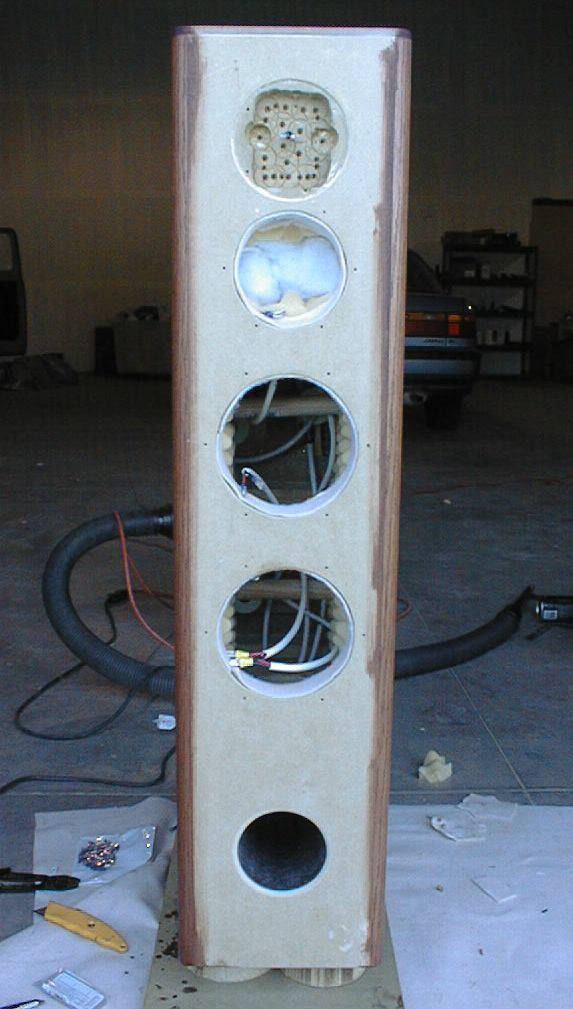
Now since the base structure was made of 1.125" particle board,
I knew I would be doing some serious additions to it in order to keep
density down, vibration at a minimum and structural integrity fully
intact. So the first thing I did was added a piece of 3/4" MDF to
the front baffle. This brought its thickness to an impressive
1.875" (1-7/8"). This is definitely a suitable thickness
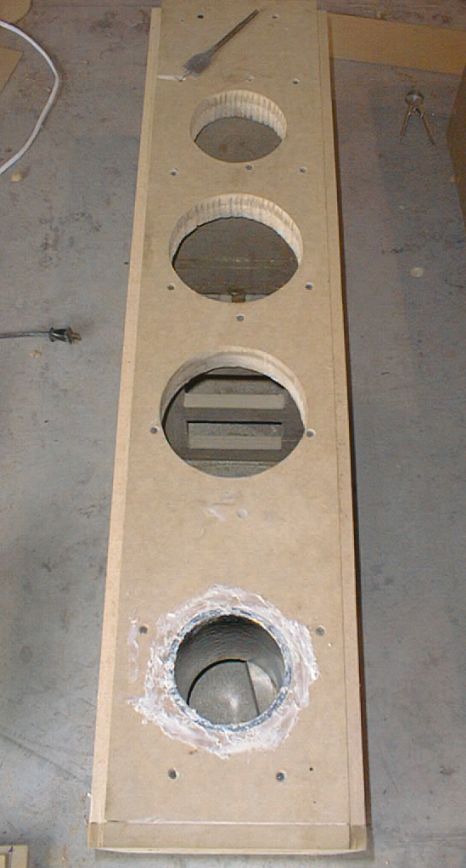
to go with, because each driver cutout reduces that front baffle's
strength. The baffle is 8.25" wide and the woofer cutouts are
6.0" in diameter. This doesn't leave much room on either side
for strength, so I make up for it in depth. After I added the
1/8" thick flushed-baffle board for the tweeter, the overall front
baffle thickness goes up to 2.0". You can see this in
the pictures. I also added a 3/4" piece of MDF to the bottom
of the enclosure to give a good base for the spikes to screw into.
I added a piece of 1/4" hardboard to the top of the enclosure to
help reduce vibration and makes the top of the speaker 1.375"
thick. Also as I have mentioned, the nice, smooth, even finish on
the hardboard is much easier to paint to perfection that the PB. The sides of the enclosure
are 3/4" MDF with 1/8" oak veneer Liquid Nailed in place
I also added (2) 1" thick dowels to the insides of each
driver compartment behind the W6's. I can tell right now that that
is the hollowest part. The front corners have 3/4" oak
quarter rounds which join the sides with the front in a seamless oak to
not oak integration. The sides will be stained Red Oak from Minwax,
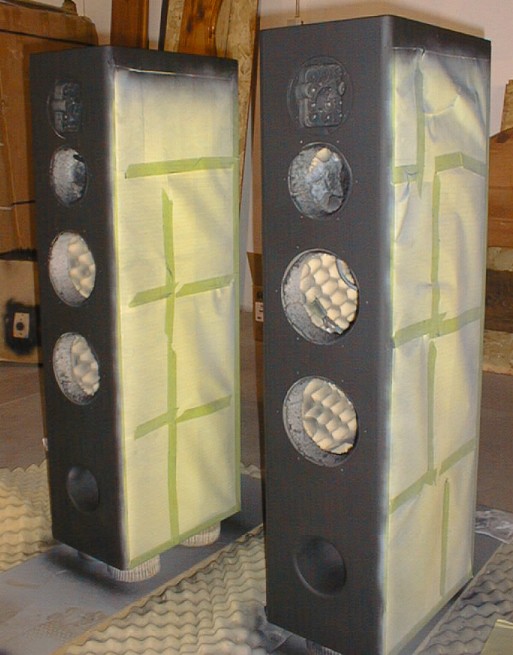
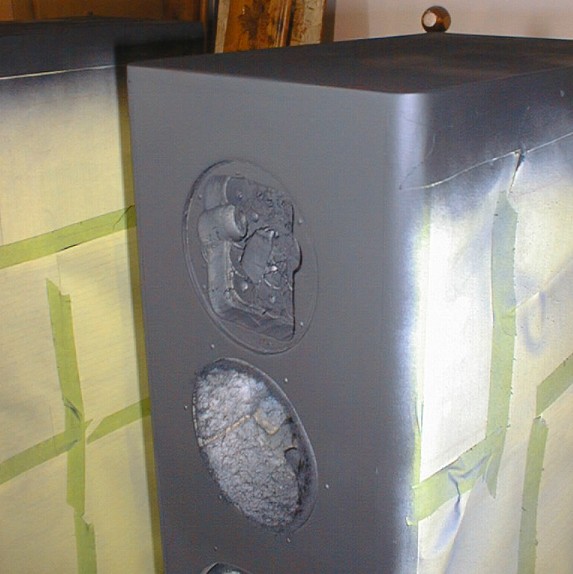
while everything else will be painted black.
Okay that's it for now. If anyone whose been reading this has
suggestions for internal bracing technique or feels that some area of
this design has been overlooked and it's not too late to fix, feel free
to drop me a line, and let me
know what you think. I will be more than happy to consider your
thoughts into the making of these Swans M3 Tower Speakers.
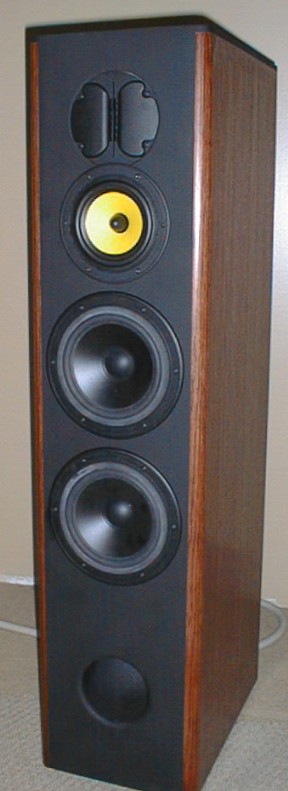
They're All Done!
I don't think anyone can describe the feeling that you get when
you're only hours away from finishing a brand new pair of
speakers. Speakers that you just spent hundreds of hours in
sweat, blood and tears slaving over. Screwing in the drivers one
by one and taking the first look at your new masterpiece gives you a
feeling of ultimate excitement mixed with anxiety. The big
question, "How will they sound???" Well I was worried,
very worried. Probably because I hadn't done many pre-finish tests
on the drivers, crossover or cabinet. I trusted that Hi-Vi Research
had done all their homework already when designing this speaker system
and crossover. I didn't need to worry about padding the midrange
or tweeter or getting just the right crossover frequency points to match
for each driver. That was already done. The main thing I had
to worry about was how well the cabinet was built and how well they would integrate with the
drivers. I must mention that each speaker must weigh over 100
lbs. I haven't weighed them, but they are very heavy. The
spikes on the bottom make placement on carpet somewhat of a challenge,
so I have taken them off for right now.
Now as with any speaker, they need some break-in time. Many
manufacturers recommend as many as 100 hours before doing any serious
listening tests or measurements on a brand new pair of speakers.
But that doesn't stop you from listening to them right away
anyway! We set the speakers about 8 feet apart with a slight toe
in so that the speakers actually pointed to a location about 3 feet
behind the listening position. Our listening position is about 10
feet from either speaker. This was an initial set-up and so far
has proved to be the most promising. The first disc I played was
from a favorite band of mine, The Beautiful South. Lead singer
Paul Heaton has a voice in a range that many speakers simply cannot
reproduce without adding some sort of resonant coloration. Mainly
due to poor cabinet design, as his voice hits in the low 300 Hz which is
problematic for most conventional speakers when it comes to male
vocals. But first thing I noticed when popping in Painting It Red
was wow, this is the first time I've really heard how his voice is truly
suppose to sound! It was incredible rich and pure. In the
lower range, there was no coloration whatsoever. In the upper
range you could hear the saliva in his mouth as he opened and closed
hismouth to sing. The plucking of the guitar sounded natural and
smooth. Once again no added resonances to taint the notes of each
string. Now all doesn't go without flaw, I can tell right now the
midrange is very forward. Even given its 86 dB sensitivity sitting
right between the woofers (90dB+ and the tweeter 93 dB, though padded,
has very little padding at all). It's not that the midrange driver
sounds louder, but that the overall tonal balance puts more emphasis on
the mid frequencies. So I am hoping that as it breaks in it will
tone down, soften up a bit and smooth out with the rest of the
drivers.
The ribbon tweeter makes the speakers have a very localized
sound. As you walk around the room, the tonal balance and image
changes drastically. However, there isn't a one single sweet spot
where it sounds "the best". So far I have noticed that
the speakers have multiple very acceptable and very smooth points of
listening throughout the room. Each one just gives you a different
sense of where the sound is coming from and puts more or less detail
into the different instruments. The imaging on these speakers is miraculous. When you sit yourself
down in a spot dead center of the the speakers, you physically become
part of the musical experience. You lose mental sight of the left
and right speaker and the music takes up a stage that extends beyond
either speaker in each direction. They sounded in a word, great.
One other very surprising but obvious tonal thing to note is that
these speakers have some serious bass. You wouldn't think that
6.5" drivers could move any air at all, but these speakers prove
all those theories wrong. And not only bass, but very deep
bass. During some well known deep bass passages of some favorite
tunes these speakers just shined and gave it all they had and didn't
strain. That's when a couple audiophile friends of mine stuffed a
foam "port bung" into each of my ports and then said,
"That sounds so much better! Now the bass sounds neutral and
balanced." Granted they did have a point, I won't go into why
the "foam bung" made it sound better to them. Other than
that the bass was reduced, turning the cabinet into a nearly sealed enclosure.
Of course some air was getting out. They absolutely loved it. I am still somewhat
dubious of the whole thing, just because it alters the whole original
design. However since it is a simple and quick alternative, it
makes for an interesting comparison between two enclosure types. I'll
admit that a cello played with and without the bungs, sounded much
better with the bungs, probably because it was less boomy.
That's all I have time to write for now, but that's the basis of how
these speakers are sounding. From a purely emotional and biased
point of view I absolutely love these speakers and and falling in love
more and more as I listen to them. I'm reliving all of my old CD's
and just enjoying them all over again from a totally new point of
view. And I'm having so much fun doing it! Stay tuned for
more thoughts on these speakers. Feel free to look at all the
pictures. They don't do these speakers justice for what they
really look like. Are they perfect? No. Did my own two hands
create them? Yes! And that's the most important thing.
2022 Update
Well I've had these speakers for 22 years now and
they've recently taken center stage in my home theater once again after
being in my bedroom for the better part of a decade. To this day these
are still some of my favorite speakers. They worked flawlessly in every
application I've used them in and am one again appreciating what they
can do in a home theater setting. Movies just come alive with these
speakers. I wish the W6 driver was still available, since the F5 and
RT1-C tweeter are still in production you could build this speaker brand
new today just as it was originally designed. However, in the absence of
the W6, I believe the Dayton Audio RS180-8's would make excellent
replacements without changing the volume of the cabinet or the
crossover. I recently replaced the W6's in some bookshelf speakers with
the RS180-8s and they sound awesome. Anyway, these are great speakers,
check them out below in my family room theater. Right now they are
married up with a UM18-22 sub and a Dayton Audio MTM center channel.
It's a great setup that I enjoy almost every day.

.jpg)
Driver's Design Parameters and
Specifications
|
Original Swans M3 by
Manufacturer

Cabinet Drawing
Cabinet Specifications
Driver Cutout Locations
The Crossover

RT1-C Tweeter

F5 Midrange

W6 Woofer

My CAD of Enclosure

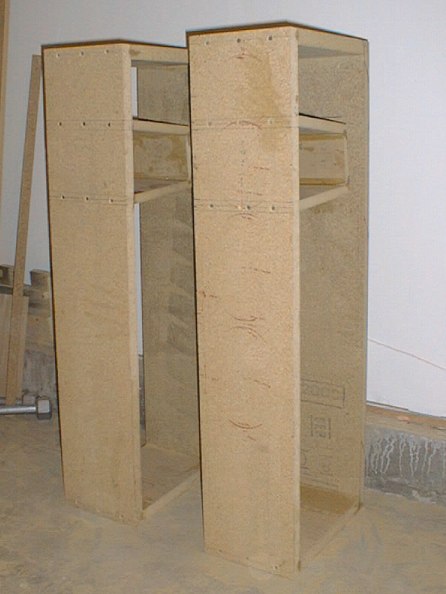
Front View Cabinets

Cabinets

Side View

Side View Midrange Cavities

Bracing Structure

Sides Completed

Front Baffle

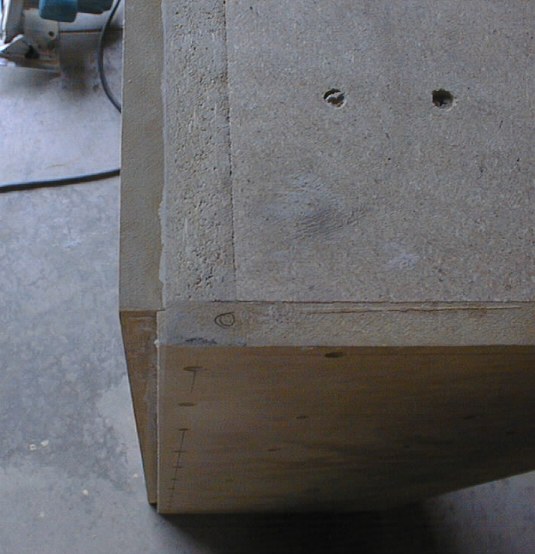
Side and Front

2" Thick Baffle

Cutting the Holes

Interior Baffle Ribbing

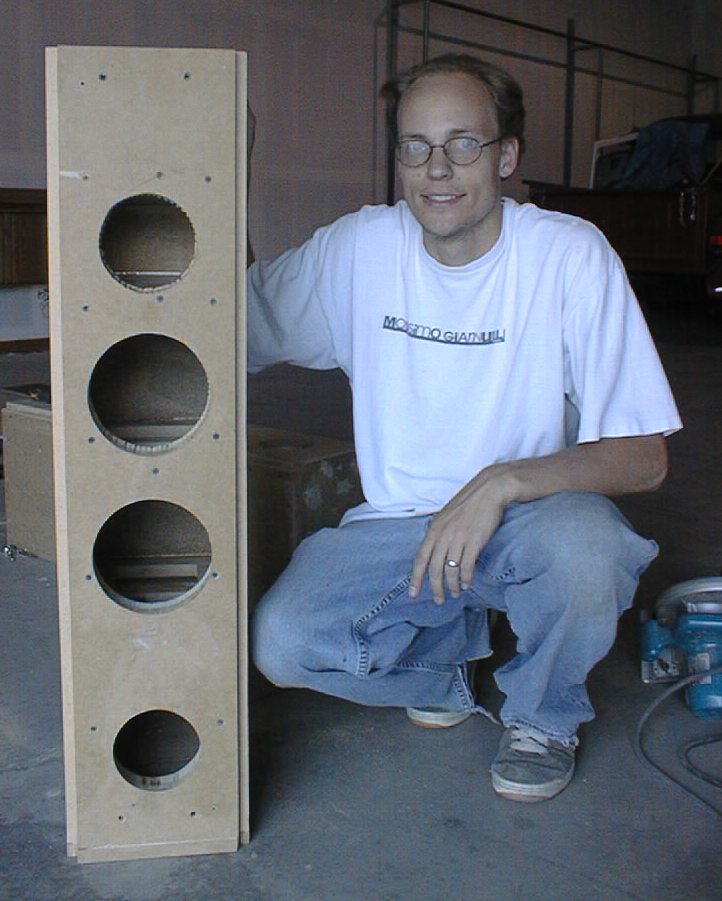
Me

First Glance with the Drivers
And the Tweeter

The Sweat Shop

Gluing the 1/8" Baffle

Inside View of Corners

Nearing Completion

Beautiful Oak Sides

Applying the Stain

The Crossovers

Midrange Stuffing

Red Oak Stain

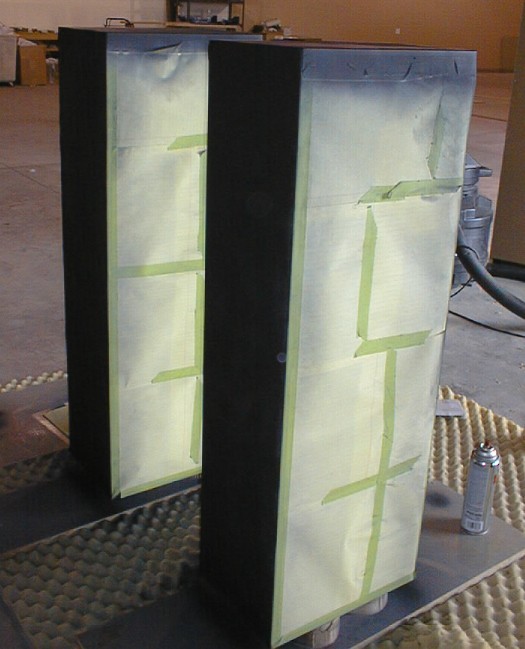
Painting it Black

Close-Up

Rear View

Taking off the Paper

Close-Up

First Look

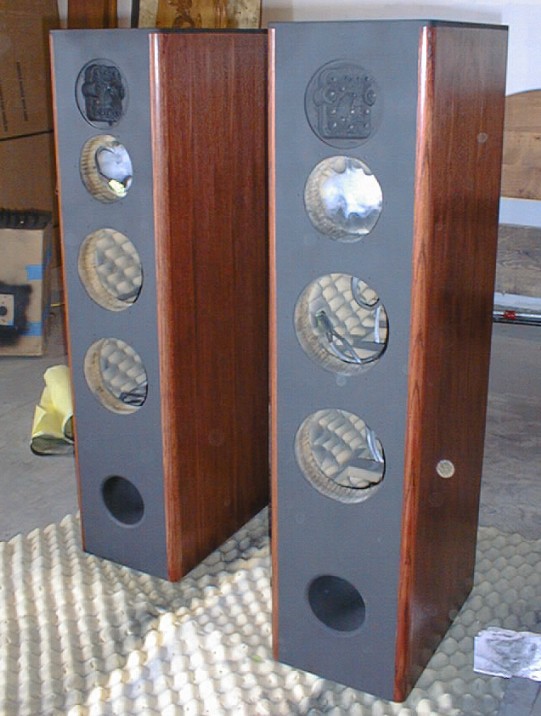
Front View Complete

|